10 Tips for Starting an Urban Garden!

If you follow me on Instagram, you’ve probably seen me post garden photos the last few years. I’ve grown window herbs and succulents for quite a while, but when we bought our house in 2012, I knew I wanted to eventually have a big garden. I gardened a lot with my family growing up, and the produce you grow yourself almost always tastes better than anything you can find at the store.
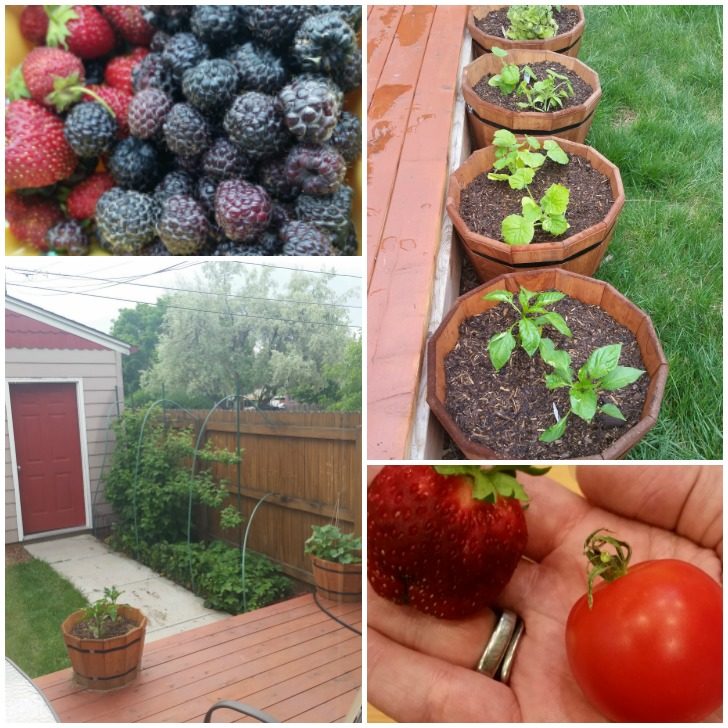
Year 1 It definitely started out pretty rocky despite my initial assumption that gardening with my parents as a kid in Texas meant I could make things grow here in Colorado. There were a few strawberry and black raspberry plants in our backyard when we moved into the house, so the first year we fumbled through harvesting and weeding those as well as planting a small, but successful, herb garden.
Year 2 I became obsessed with container gardening and planted about 15 different things in containers with the wrong type of soil (it never drained) and I was sad when nothing really took off besides a couple tomatoes (that were pretty much on the plant when we bought it), some berries, and some basil. Lots of pretty leaves and flowers, but nothing really made vegetables. Not even the zucchini which I had been told we would be able to use to feed an army.

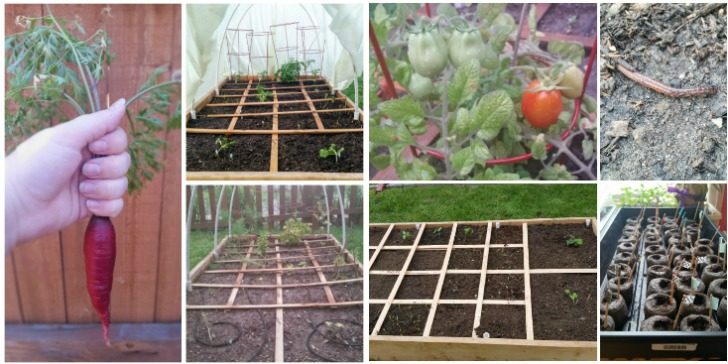
Year 3 was when I took an urban gardening boot camp at the Denver Botanic Gardens, learned about soils, starting seedlings, and square foot gardening, and we got really serious and built a raised bed in the middle of our urban front yard. (Yep, we’re those people.) This was the first year that we truly got a small harvest out of our efforts. This was also the year that it rained for most of May and hailed at least once a week in June and July, so half the summer was spent racing out to cover the bed with tarps in hopes that at least some of the leaves would be saved. (The bottom middle photo is post-hail when most things were wiped out by the storms.)

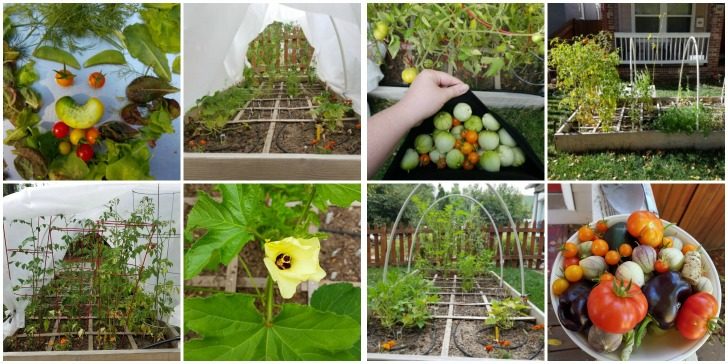
Year 4, last year, was when I got some more help to nail down my square foot gardening skills, dialed in my soil and fertilizer needs, was given the secret to amazing peppers from our friend who I’ve nicknamed “the pepper whisperer”, bought some of my seedlings for slow growing things like peppers and tomatoes instead of starting it all from seed, and installed an automatic watering system so I didn’t have to remember (or wake up early) to water in the summer months. We still had some hail last summer, but I was prepared ahead of time with row covers on hoops and we managed to have an amazing harvest! Below are some highlights, but check out #PowersfulGarden2016 on IG for more photos.

As you can see, learning to garden is a whole lot of trial and error since there are just so many variables that go into it: plant type, seeds, water, soil, fertilizer, mother nature, climate type, garden type, pests, and time you have to spend. Probably some luck in there too. You can read up on gardening all you want, but until you really try it yourself, you won’t be prepared. Even once you’ve tried it yourself for 4 growing seasons, you still may not be prepared. So go into it knowing that things may fail the first couple years as you learn and I promise you’ll be much happier with the outcomes.
This post contains affiliate links. Sustaining the Powers is a participant in the Amazon Services LLC Associates Program, an affiliate advertising program designed to provide a means for sites to earn advertising fees by advertising and linking to Amazon.com. When you use these links to make purchases, I earn a portion of the sales at no extra cost to you. Thanks for helping to keep our pantry stocked! <3
So now that you know a little bit about my gardening history, I wanted to share some of the top things I’ve learned over the last 4 years.
10 Tips for Starting a Backyard Garden
-
Start Small
I know it’s exciting to jump in with all the different possibilities, but you’ll thank me later when you’re not overwhelmed with how many different things you’re trying to learn for each plant type and how many square feet you have to weed and water each week. Start with 4-5 things in a bed or containers the first year and then add another 2-3 each following year so you can become an expert at growing them. Plants are like children – they each have different needs and different personalities you learn about as you go, so it’s much easier to add new ones after you’ve had a year with the old ones. My favorite starter plants for new gardeners: tomatoes (from seedlings/young plants), zucchini (from seedlings or seeds), green beans/snap peas (from seeds), cucumbers (from seed or seedlings), carrots (from seed), and lettuce (from seed).
-
Get Your Soil Right
If you think you can just dig up a corner of your yard and stick your plants in the ground, you are going to be sorely disappointed in your harvest. Your yard most likely just has a bunch of dirt that a construction crew trucked in a number of years ago to level the ground and plant your grass. Good garden soil is actually a living environment and contains microorganisms, decaying organic matter, earthworms and other insects, and it takes a bit of cultivation. Yard dirt is essentially dead soil, so it’s missing out on all the good stuff. I’m keeping this brief, but here is some good further reading for soil.
If you can, go to your local garden center and purchase some bags (or a truck load) of garden soil, container mix if you’re working with containers, or at least some compost to mix into the plain dirt you have. Once you invest in good soil, you can just amend the soil with a bit of compost in following years. We practice the “no till” method (out of laziness mostly) and just pour our compost on top then use a shovel or pitchfork to let some filter into the lower layers. Our worm population is thriving. See the video below for a demo. (Also, apologies it’s vertical. I have no idea what I was thinking!)
-
Keep a Journal
Especially of what varieties of plants you had and the locations you planted them. This could be photos and captions on Instagram (my favorite), notes in your phone, or a paper journal. Knowing what worked and didn’t work in previous years can help you become a better gardener in future years.
-
Get to Know Your Local Nursery
They will be your best resource in getting to know what does well locally because not every plant is easy to grow in every climate. Most garden centers offer free or cheap classes and free advice. Some even have a gardener help hotline! They’ll usually take your plants back if
you kill themthey die too. (Not that I know this from experience. *cough*) I much prefer local places over big box stores because nursery workers are usually skilled or “master” gardeners and landscapers and they’re growing the plants in house. Plus supporting small business is awesome! -
Learn Your Frost Dates
Nearly all seed packets (and seedlings you buy) will have planting recommendations on the back that are related to your frost dates. (I’ll post more about reading seed packets in a future post.) Some plants love cool weather, others will wither below 60 degrees, so when you plant is very important to the success of your garden. Click here to go to the Farmer’s Almanac and find your date by zip code. Here in Denver, we tend to get snow/last frost as late as Mother’s Day and first frost as early as the end of September, so we have a short time to get stuff growing and happy. Warmer climates have an easier, longer growing season. The Farmer’s Almanac also has a handy planting guide that will send you planting reminders.
-
It’s Worth it to Start From Seedlings in the Beginning
My first few years I got way too excited about having to do all the steps and grow my own plants from seeds. I got the timing all wrong, and with the short growing season in Colorado, I missed out on harvesting anything from my wimpy tomatoes and peppers. Starting off from nursery seedlings ensures you have a solid plant to begin with and it can save a lot of headaches later on.
-
Edge Your Garden Beds with Marigolds for Pest Control
We fought squirrels and cats for 2 years before I gave in and tried this. I had zero issue with squirrels and cats in my garden last year, so I’m a believer. Plus they’re really pretty. Since each region will have different pest problems, your local nursery is a great resource for help controlling pests with traditional or organic methods.
-
Fertilize
Plants need nutrients just like we do. Be sure and follow the directions on whatever fertilizer you get and choose one that’s right for the type of soil and plants you’re growing. I really like this Gardner & Bloome Organics Tomato Vegetable and Herb fertilizer because it has a good balance of nutrients for a variety of plants, it’s slow release (I fertilize twice a season – once at planting and once when fruit begins to form), feeds the soil environment, and it’s organic. I prefer to steer clear of MiracleGro because it is too quick release which can stress plants and it has been shown to build up salts in the soil over time which can harm your soil environment.
-
Water Less Often Than You Think
Too much water can drown the plants. Especially things like peppers that don’t like “wet feet”. The general rule of thumb is an inch of water per week in average weather, either by rain or watering. At least double that in hot (70+ degree) weather. Place a rain gauge or tuna can in the bed and the plants have an inch of water when the dish has collected an inch. If your plant leaves droop in the hot sun and perk up after the sun goes down, they are still fine and not dying. If they wither and don’t perk back up, they probably do need a bit more water. You should also make sure to water before the sun is out or after it is down to protect the plant leaves from sunburn through water spots and conserve water. We use an automatic system that runs at 3am twice a week.
-
Sunlight Matters
Check the planting instructions for each plant and place them in the right amount of daily sunlight. The best place for a “full sun” veggie garden is in the middle of your yard away from the shade of a fence with the bed facing North-South to optimize sunlight. Think about the eventual heights of the plants and don’t tuck your (full sun) peppers in under the shade of your tall tomatoes.
Are you overwhelmed yet? If you are, don’t worry. We all were at first. Grab some good soil and get your hands dirty and you’ll eventually catch on I promise! I really enjoyed putting this post together, so I think I’ll keep going on this series. What do you think? Leave your gardening questions below and I’d be happy to answer them if I can!


Love your post!! So insightful! I am completely inexperienced at gardening. One thing I always struggle with is what is a weed and should be picked out, and what is not? How do you navigate that? Looking forward to more posts 😊
That’s a great question! The easy answer is if you didn’t plant it, it’s a weed. But that’s not always the case if you inherited a garden or flower beds. And sometimes the little seedlings that sprout look just like weeds when they’re small. I like to use plastic markers right behind my seeds when planting so later I know where they are and can keep things neatly laid out. You can always google images of what you planted and compare leaf shapes. Most common weeds won’t look like your veggies after the veggies have grown for a few weeks and the weeds tend to stay small. It’s even easier to differentiate if you plant seedlings since they will have leaves when you plant them. Flower bed weeds are a bit harder, but most of the time those weeds will also look really different from your mature flowering plants. Often they are dandelions or clover around here.
This is amazing! I’m determined to try a few plants this summer and hopefully not kill them! 🙂 I would love any tips on choosing plans for a raised garden bed.
We love using the square foot gardening method. You essentially build a raised bed that’s a grid and each grid is a different type of plant. Lots of online resources for getting started and how and what to plant per sq. ft. Tons of free build plans around the web. http://www.squarefootgardening.com
Build wise, we kept it simple and used cedar 1 by 12 boards formed into a 4ft x 8ft box and attached them together with lag screws at the corners. The top grid is cheap wood lathe strips stapled. I could probably have my husband put together a 3d mock up if you like, but really it’s just a box. You can make them out of a lot of different materials, you just want to avoid painted stuff (due to unknown chemicals leeching into the soil) and choose something in your budget.
Yup, I’m definitely overwhelmed. I’ve wanted to grow some of my own veggies for a while, but we do so much traveling during the summer (plus it just looks really hard). Maybe I just need to give in and start small.
It’s definitely much harder when you travel a lot. We put in automatic watering systems so we didn’t have to beg anyone to water while we’re out of town. Start small with a few container things and see what happens. It can’t hurt to give it a shot! You can always get a “plant nanny” watering spike that will help keep your plants moist for when you do travel. We use them on our container plants and our indoor herbs.
Last year was our first garden. My husband and I dug out a garden on one side of our back yard. We had a few different veggies and some herbs. I am wondering what to do with the remains of last years plants. Do I dig them up and start new again or do I leave them? Thank you for this post it is very helpful.